Robot
Overview
Based on natural language processing and deep learning, Hyphenate robot trains on the dialogue model established using massive data. Loaded with knowledges from multiple industries and domains and strengthened with the real-time feedback from Hyphenate Customer Engagement Cloud, Hyphenate robot can accurately recognize the customers' intentions and assists agents or works as an agent to answer frequently asked questions, reducing the cost of customer service.
Hyphenate robot is also an agent. You can use the robot's account to log in to Hyphenate Customer Engagement Cloud to monitor the robot's conversations with customers and view the robot's historical conversations.
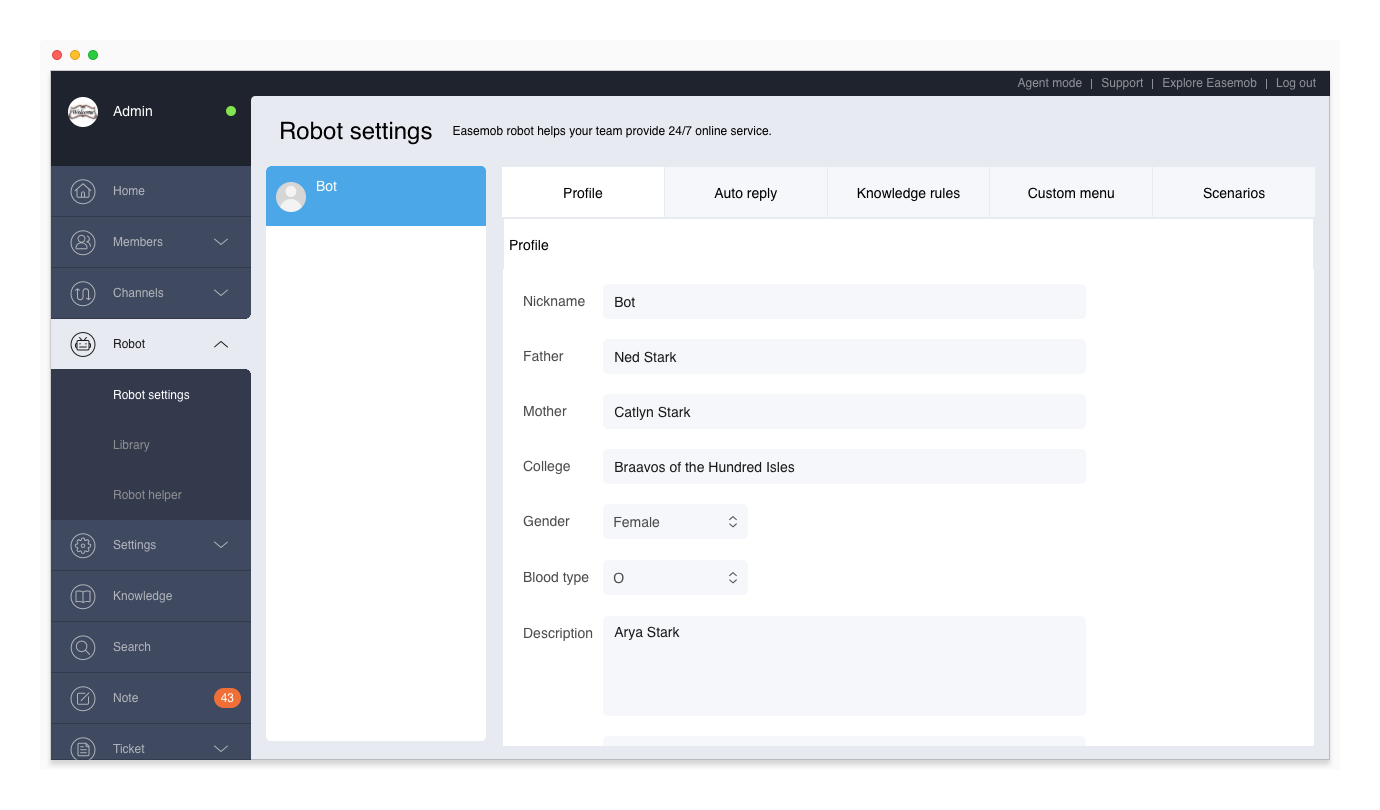
To view the robot's account information, go to “Admin Mode > Robot > Robot Settings > Profile”. The initial password is 123456.
Chat Functionality
The robot's knowledge base consists of: a chat library and knowledge rules. The chat library is a built-in function of the robot. To turn it on, go to “Robot Settings > Auto Reply > Default Reply”. Knowledge rules can effectively improve the robot's ability to solve service problems. To set knowledge rules, go to “Robot Settings > Knowledge Rules”.
The robot can chat with customers from app, web pages, WeChat, and Weibo. When a customer sends a message that meets a preset knowledge rule, the robot will automatically reply with an answer in the knowledge rule. If a message sent by the customer is not a perfect match to any knowledge rule, the robot replies with a menu of similar questions.
Use Numeric Menus on App
By default, the robot sends click-able menus to app (shown in Figure 1), which requires you to integrate the Display Robot Menus function on your app. Otherwise, the click-able menus would be an empty message on your app. If you haven't integrate the function or you want to change click-able menus to numeric menus (shown in Figure 2), you can go to “Robot Settings > Profile” and turn on the “Use numeric menus on app” feature.
Chat with Agent
In the following scenarios, the customer can choose to chat with agent:
- Scenario 1: The “Add a 'chat with agent' button for all default replies” option is checked on the Default Reply tab. When the robot sends a default reply, a “chat with agent” button is attached to the message.
- Scenario 2: The “Chat with agent” option is checked under a menu item on the Custom Menu tab. When the robot sends the menu, a “chat with agent” button is attached to the menu item.
- Scenario 3: When the customer sends “Chat with agent” to the robot, the robot transfers the conversation to an agent.
Similar Questions
If a customer's question matches a question in a knowledge rule by 85%, the robot replies with an answer in the knowledge rule.
If a customer's question does not match any question in the knowledge rules by 85%, the robot replies with 1 to 5 similar questions from the knowledge base.
Knowledge Rules
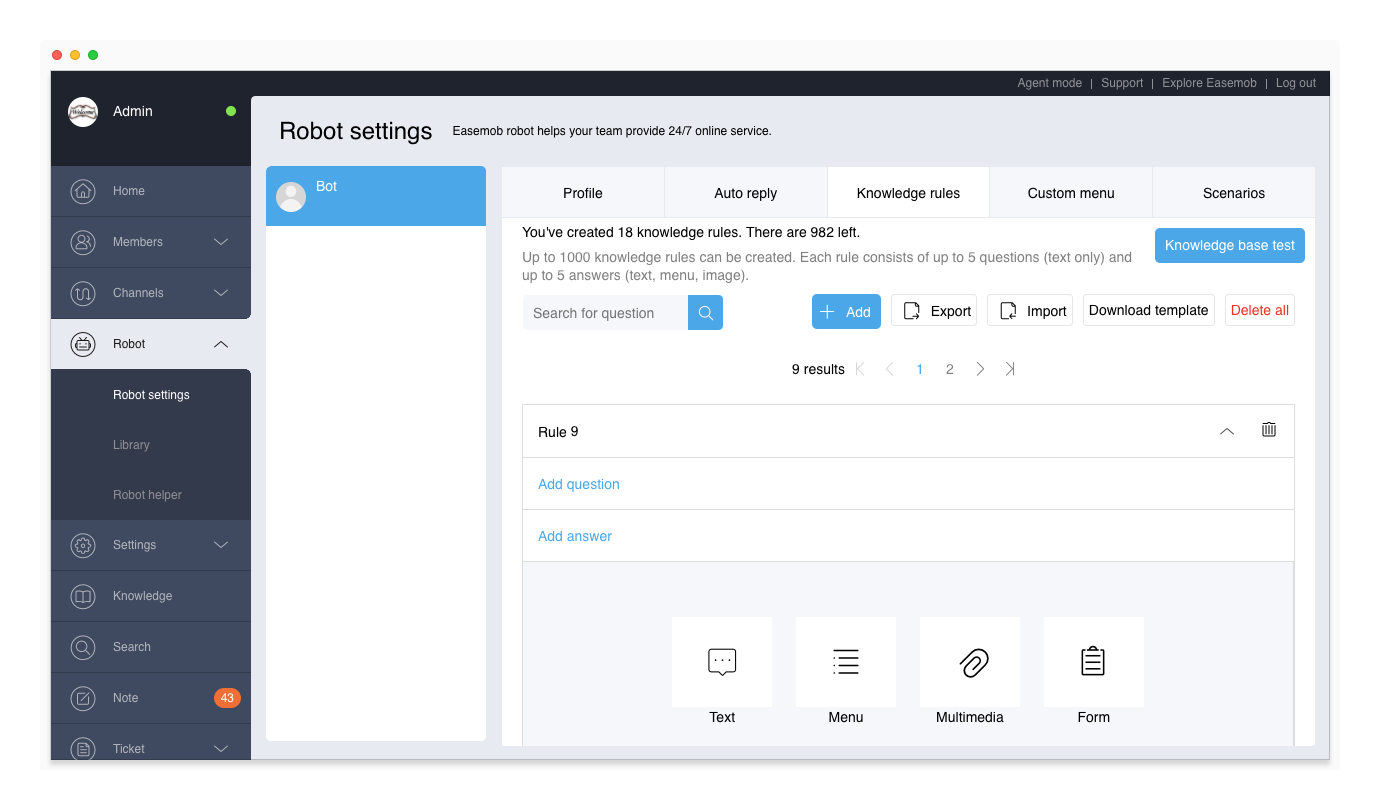
Setting up knowledge rules can effectively improve the robot's capability to solve service problems. A knowledge rule contains one or more questions and answers (go to “Admin Mode > Robot > Robot Settings > Knowledge Rules” to add knowledge rules). When a customer sends a message that meets a preset knowledge rule, the robot will automatically reply with an answer in the knowledge rule.
In the knowledge base, you can enter up to 1000 knowledge rules. In each knowledge rule, you can add 5 questions and 5 answers. When the robot matches any question, it will reply with one of the 5 answers.
Import Knowledge Rules
When you use the robot for the first time, it is recommended that you organize the Q&A into pairs of questions and answers and import them to the knowledge base. The basic principle of questions is to be as specific as possible. Here are some examples: What do I do when I lost the train ticket? How to upload pictures? How long is the delivery time?
To import knowledge rules:
- Go to “Robot Settings > Knowledge Rules” and click Download Template in the upper right corner to download the template in Excel format.
- Enter the questions and answers (text only) one by one into the Excel worksheet.
- On the Knowledge Rules tab, click Import in the upper right corner and follow the steps to import the entries in the file into the Knowledge Base.
After the import, each knowledge rule contains only one question and one answer. The knowledge rules can be supplemented with questions and answers.
Complement Knowledge Rules
In most cases, one knowledge rule solves one question, and one question and answer is sufficient. You can also add multiple questions and answers to a knowledge rule.
Add a question
To increase the probability of matching a question, you can add multiple similar questions (up to 5). For example, delivery time, what is the delivery time?
To add a question to a knowledge rule, expand the knowledge rule and click Add Question.
Add an answer
When there are multiple answers to a question, you can add multiple answers (up to 5) for a knowledge rule. When a question in the knowledge rule is matched, the robot will randomly return one of answers.
The answer can be text, menu, or multimedia.
- Text can be edited directly.
- Menus can only be selected from the “Custom Menu” and can not be edited directly.
- Multimedia can only be selected from the “Library”, and cannot be directly edited (currently only pictures less than 1MB are supported).
Maintain Knowledge Rules
The knowledge base can contain 1000 knowledge rules. You need to constantly modify and improve the knowledge rules and regularly delete duplicate or deprecated rules, in order to have a better understanding of your customers and improve the efficiency of knowledge rules.
If a knowledge rule is rarely matched, the question in the knowledge rule may not meet the user habits. In this case, you need to adjust the question or add more similar questions to improve the matching.
Organize Knowledge Rules in Batches
You can organize the knowledge rules using the import and export functions. Follow these steps:
- Go to “Robot Settings > Knowledge Rules” and click Export in the upper right corner to export the knowledge rules in Excel format.
- Open the Excel worksheet, modify the questions and answers in the knowledge rules, and delete the knowledge rules that are duplicated or no longer used.
- On the “Knowledge Rules” tab, click Delete All to delete all the knowledge rules.
- On the “Knowledge Rules” tab, click Import to import the locally edited Excel file.
Note: The Delete All button deletes all the knowledge rules, and the deleted rules cannot be restored. Make sure that you have a backup of all your knowledge rules before you hit this button.
Match Principle
The robot matches customers' questions based on the keywords in the questions. The process is as follows:
- The robot breaks the questions in knowledge rules into a number of keywords and ignores the modal works, functional words, and punctuations.
- The robot breaks the the customer's question into a number of keywords and ignores the modal works, functional words, and punctuations.
- The robot compares the keywords and returns the answer or similar questions based on the matching level.
If questions in knowledge rules are complete and keywords are specific, the matching probability is high.
Knowledge Base Test
Admins can chat with the robot to test the robot's answers and optimize the knowledge rules and custom menus.
To test he knowledge base:
- On the Knowledge Rules page, click Knowledge Base Test in the upper right corner and chat with the robot. The dialog box shows the knowledge rule or menu used by the robot and the matching rate.
- Click a matching rule to see the details of the rule and optimize the rule. If the robot couldn't find a matching knowledge rule to your question, you can quickly add a knowledge rule.
Custom Menu
The robot's custom menu is a good way to guide the user's question and answer, suitable for self-service system. The custom menu can be used in the welcome message, default reply, and knowledge rules.
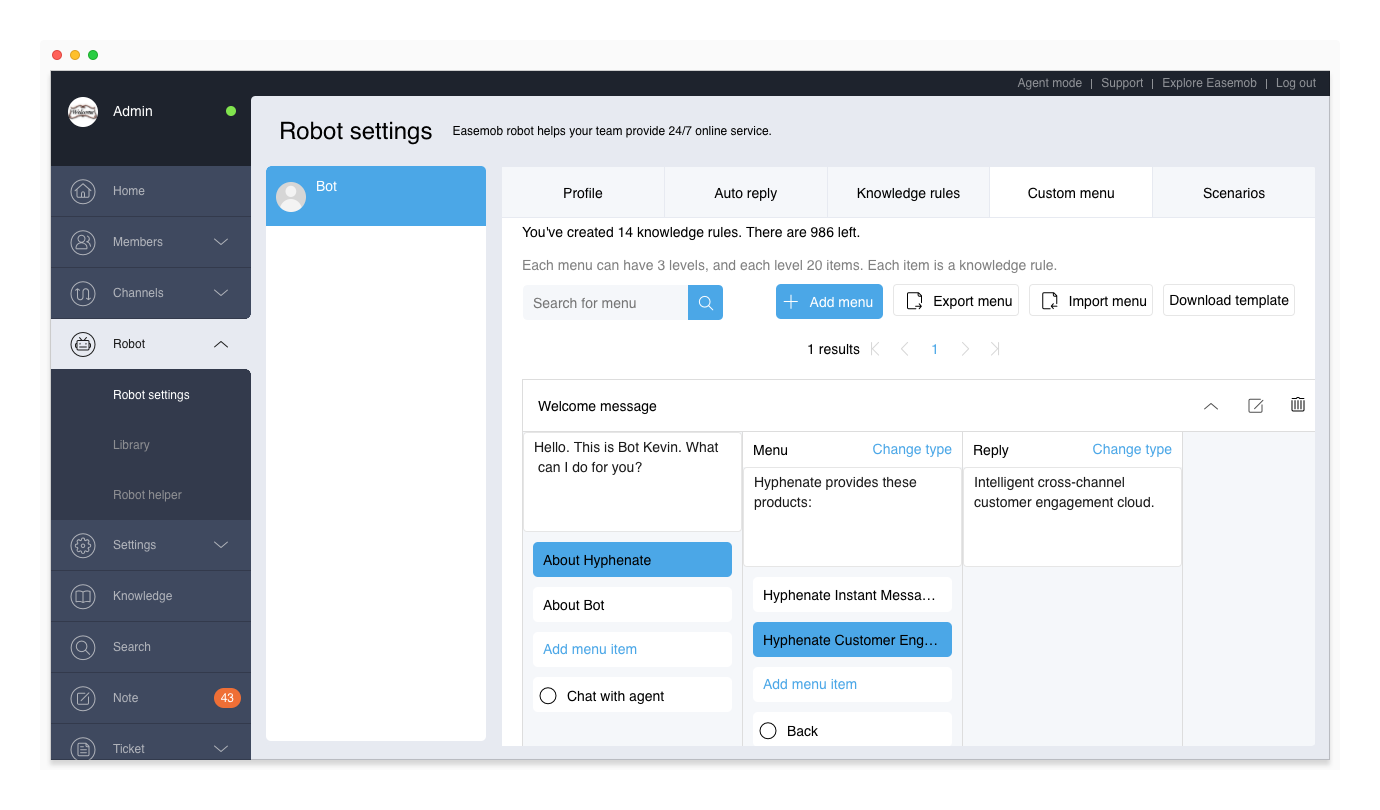
The custom menu is where you manage all the robot's menus. You can add, modify, delete, and view menus. Each menu supports up to 4 levels (not including answers) and up to 20 menu items per level. Each menu item is counted as a knowledge rule.
Menu structure
Each menu consists of a menu name and 1 to 4 levels of menu items. Each level consists of a leading sentence and several menu items. You can add sub-menus or text answers to level 1, level 2, and level 3 menus, but only text answers to level 4 menus.
Each menu name and menu item name is a question, which is the same as the question in a knowledge rule. When the customer enters a menu name or a menu item name, the robot will reply with the menu items directly.
Add a menu
You can add menus on the Custom Menu tab. Follow these steps:
- Click Add Menu and enter the menu name to add a new menu, which resides at the top of the list.
- Modify the leading sentence and click Add Menu Item to add a menu item.
- Select the menu item that has been added and click Add Submenu to add a submenu.
- Repeat steps 2 and 3 to add more levels of menus.
- (Optional) Check the “Back” or “Chat with Agent” option under the menu item.
Note: The “Back” and “Chat with agent” buttons do not add up to the number of knowledge rules.
Modify a menu
You can only modify the menus on the Custom Menu tab. To modify a menu, click the menu name bar to expand the menu and edit the leading sentences, menu items, answers, and so on. The modifications is automatically saved.
Delete a menu
To delete a menu, click the Delete button to the right of the menu. After a menu is deleted, the position where the menu was applied will display “The menu has been deleted”, and the robot will no longer return the menu answers to the customers. When you delete a menu item within a menu, all the submenus of the menu item will be deleted.
Auto Reply
Auto replies include the robot's welcome message, default reply, reply to repetitive questions, reply to customer timeout, and chat with agent settings.
Welcome Message
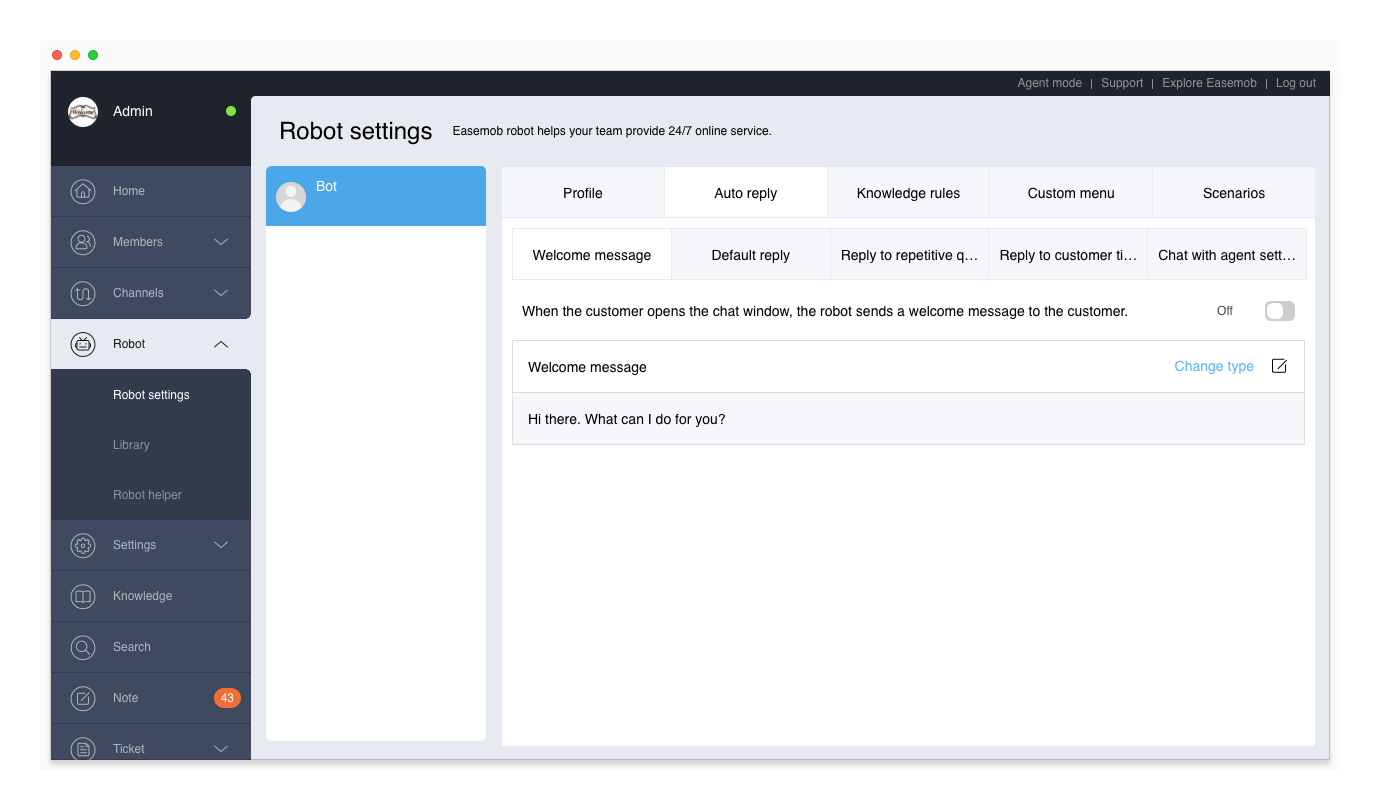
The robot welcome message is turned off by default. If you turn on the robot and set the robot welcome message, when the customer opens the chat window (on app or web), he will receive the welcome message from the robot. (Note: An API must be called to display the welcome message on app.)
The welcome message can be text (up to 1000 characters), a menu (created on the Custom Menu tab), or multimedia (uploaded on the Library page).
Default Reply
The chat library contains massive precise dialogs and enables the robot to communicate with customers. It is a built-in function and cannot be customized. The chat library is turned off by default. You can go to the Default Reply tab to turn it on.
You can set 1 to 5 default replies. If the robot cannot match the customer's question to an answer or similar questions, the robot will randomly send a default reply to the customer. If you do not set any default replies, the robot will send “I'll think about it” to the customer.
The default reply can be text (up to 1000 characters), a menu (created on the Custom Menu tab), or multimedia (uploaded on the Library page). You can also add a “Chat with agent” button to each default reply. The button is located below the message. When the customer click the button, the robot transfers the conversation to an agent.
Reply to Repetitive Questions
You can set 1 to 5 replies to customers' repetitive questions. When the customer sends exactly the same message for three times in succession, the robot will randomly send one of the replies to the customer. If you do not set any replies to repetitive questions, the robot will send the reply “You've said that for three times”.
Reply to Customer Timeout
You can set the timeout time (1 to 30 minutes) and 1 to 5 replies to customer timeout. When the customer has not responded within the timeout time, the robot will randomly send one of the replies to the customer. If the customer still does not reply, the system automatically closes the conversation in 1 minute. If you do not set any replies to customer timeout, the system sends the reply “Hi. Are you still there? If not, I'm gonna close the conversation.”
Chat with Agent Setting
On the Chat with Agent Setting tab, you can set the available message, availability, unavailable message, and transfer to team.
- If the customer chooses to chat with agent and the transfer is successful, the robot replies with the available message.
- If the customer chooses to chat with agent but the transfer fails, the robot replies with the unavailable message.
To availability can be set to: Always available, Never available, Work hours, Non-work hours, and custom time.
You can configure the robot to transfer conversations only to one team. The team is not specified by default.
- Scenario 1: Use the default configuration (not specified). When the robot transfers a conversation, the system automatically assigns the conversation to a team or agent based on the routing rules set on the “Settings > Routing” page (see below).
- Scenario 2: Specify a team for the robot. When the robot transfers a conversation, the system assigns the conversation to the specified team.
Turn on the Robot
Go to “Admin Mode > Settings > Routing” and bind the robot to one or more channels or channel accounts. The robot will start working right away.
For information about routing rules, see Settings (Routing).
Scenarios
Hyphenate robot can identify customers' logistics-related consultations. You can set a reply for each logistics intent (complaint, inquiry, tracking, and delay). To help customers track their goods, you switch to the interaction mode for tracking. By doing this, the robot can automatically query the logistics status for the customers and directly send the query results to the customers.
On the Scenarios tab, check all the required intentions and configure the replies. If an intention is left unchecked, the robot will not respond to the intention.
For the definition of each intention, put the mouse on the question mark.
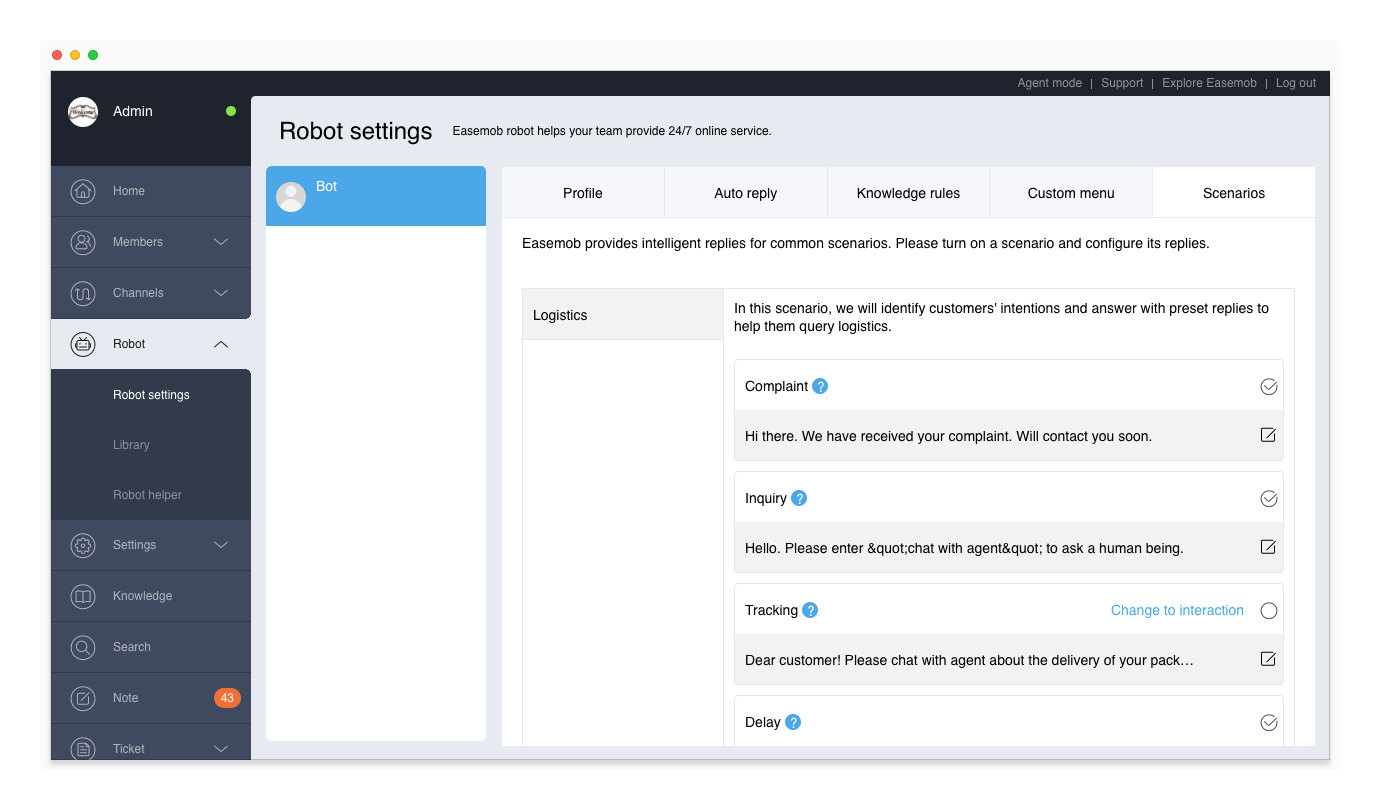
The following example shows how the robot responses the customers's logistics-related questions when the logistics intentions – complaint, inquiry, tracking and delay – are turned on and tracking is set to interaction.
Robot H5 Form
Robot H5 forms are made up of custom form items that are used to collect certain information from customers. An H5 form can be used in either of the following scenarios:
- Chat with agent: When a customer submits the H5 form during a conversation with the robot, the system assigns the conversation to an agent and sends the form content to the agent.
- Leave note: When a customer submits the H5 form during a conversation with the robot, the system generates a note with the form content and closes the conversation.
H5 forms have to be used as answers in knowledge rules. After creating an H5 form, add it to a knowledge rule. In this case, if a customer sends a message that matches to the question in the knowledge rule to the robot, the robot replies with the H5 form. After the customer submits the form, the conversation is either transferred to an agent or closed (and a note is generated base on the form content).
The robot H5 form function is a value-added service. To activate it, please provide the tenant ID and contact Hyphenate.
Create an H5 form:
Go to “Robot > Library > H5 form”, click Add Form, set the form content, and click Save.
Add an H5 form to a knowledge rule:
Go to “Robot > Robot settings > Knowledge rules”, click *Add rule*, set the question and select an H5 form as the answer.
Knowledge Base Optimization
The system automatically collects recurring customer messages that the robot has failed to match and displays them as a list. You can add these messages to knowledge rules as questions and set the corresponding answers to improve the match rate and accuracy of the robot's response.
Go to “Robot > Robot Settings > Optimize” and click the plus sign (+) to the right of an unmatched question to add it to a knowledge rule. You can:
- Add the question to the recommended knowledge rule: If there is a knowledge rule with high similarity, the system will display it as “recommended knowledge rule”. You can just select the knowledge rule and click Add.
- Add the question to an existing knowledge rule: Select Add question to existing knowledge rule. Then, the system displays a list of existing knowledge rules and you can add the question to any knowledge rule.
- Create a new knowledge rule and add this question: Select Create new knowledge rule and add this question. Then, the system automatically creates a knowledge rule containing this question and you need to add the corresponding answer to the question (if the knowledge rule does not contain an answer, the robot will reply with an empty message).
The knowledge base optimization feature is a value-added service. To activate it, please contact Hyphenate.
Multi-robot
The multi-robot function allows you to create multiple robots and configure the profile, auto reply, knowledge rules, custom menu, and scenarios for each robot. You can also bind the robots with different channels and channel accounts so that the robots can work for different groups of customers.
The multi-robot function is a value-added service. To activate it, please provide the tenant ID and contact Hyphenate.
Human-AI Hybrid Mode
Based on massive data analysis and machine learning, Hyphenate Customer Engagement Cloud can automatically establish an intelligent response model, based on the robot's knowledge base, for agents to work in the human-AI hybrid mode. In the human-AI hybrid mode, the robot can suggest possible answers to the customer's questions, and the agents can simply select an answer and send to the customer. The human-AI hybrid mode can greatly enhance the efficiency.
The human-AI hybrid mode is a feature only for the enterprise edition. To activate it, please provide the tenant ID and contact Hyphenate.